Guys, Earlier we saw the Introduction to AutoCAD that needs to be done before starting drawing. Now we will learn about the AutoCAD command line and How to use the Line command in AutoCAD.
Do you know How to use the AutoCAD command line?
Learn how to use the Line command in AutoCAD. So, let’s get started.
1. Open up the AutoCAD Application.
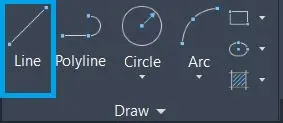
2. Select the Line icon from the ribbon panel or type “L” or Line and press “Enter” upon the command line.
3. Define the starting factor as well as endpoint using the arrow on the office or drawing location, as shown in the listed below picture
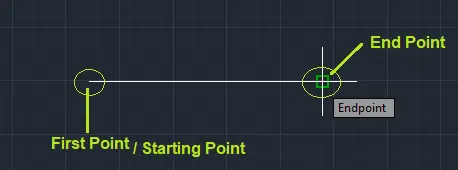
4. We can additionally continue the line sectors by specifying the endpoints.
5. Press Get In or Esc to departure.
Line command is very basic and very useful and it plays a big role in making any objects.
The designer must need a line command to draw any objects.
Every drawing can’t be complete without a line command and also the segment of the line can be modified after the draw.
Also, we can stretch lines and change the dimensions of the line.
We can also draw a line at any angle in AutoCAD.
We can draw any shape like a square, rectangle, triangle, or whatever you want by line command.
Also, we can design any plan or Isometric drawing.
How do I get the command line in AutoCAD?
If the Command line is missing in AutoCAD follow the below steps.
Utilize the alternate route CTRL+9 (CMD+3 in AutoCAD for Mac) to flip on the command line.
1. Type in the COMMANDLINE command.
It very well might be important to empower Dynamic Input to do this perceive How to empower or handicap dynamic contribution to AutoCAD:
2. Right–click on either Dynamic information or Object Snap in the Status Bar and select Settings.
3. Click the Dynamic Input tab.
4. Select Enable Pointer Input.
5. Select Show command provoking and command input close to the crosshairs.
6. Click OK.
Two Methods to Draw a Line (AutoCAD command line)
1. In the first Method We can see the line tool in the Draw panel in the Home tab; by simple selection, it will be active.
2. In the Second Method of the select line tool type ‘Line’ or ‘L’ in the command bar and press the Enter key.
By this method, we can activate the line tool from the keyboard.
Activation of the snap cursor to a 2D reference point (It helps to show the Midpoint, Endpoint, Canter, etc of the line, Shortcut key-F3), Autosnap (It snap reference lines, Shortcut key-F11), Polar tracking (It helps to snap lines in specified angles, Shortcut key-F10) from the status bar tools.
These are very useful to draw lines. To draw a straight line, we can also on Ortho (Shortcut key-F8) from the status bar.
1. Draw a line by Direct Distance Entry
2. draw the line at an Angle with the Length
We will learn all the Methods one By one.
1. Draw a line by Direct Distance Entry

Take the line tool from the Draw panel or we can also take the line tool from the command bar.
Specify the start point and endpoint of the line and then give the distance as required.
Press the Enter or Esc key or right-click and select Enter or cancel for coming out from the line command.
It will show the line as per our dimensions.
When we draw a line using this method, we need to take care of the direction of the crosshair.
We must keep the crosshair in the same direction on which side we want to make the line.
For example, if we want to draw a line vertically, the crosshair direction should be vertical.

2. draw the line at an Angle with the Length

Take the line tool from the Draw panel or we can also take the line tool from the command bar.
Type @Length<Angle, for example, @500<45, or type length and press Tab key type angle.
For example, 500 tabs and 50.
Press the Enter or Esc key or right-click and select Enter or cancel for coming out from the line command.
Instead of a typing angle, we can snap an angle.
How do I show the command bar in AutoCAD 2025?
Do one of the following:
At the top-left of the AutoCAD application window, on the right end of the Access toolbar, click the drop-down menu > Show Menu Bar.

At the Command prompt, enter MENUBAR. Then Enter 1 to display the menu bar.
How do I get the command bar back in AutoCAD?
If your command bar is missing from the AutoCAD workspace, you can restore it through these two Methods:
1. Ctrl + 9 or type Commandline and press enter, Cmd + 3 for Mac users keyboard shortcut to show or hide the command bar.
2. Open the CUI settings and change the command bar display setting.
FAQ
So for that, you need to turn on the “polar tracking” mode from the status bar. I have also mentioned that in my article about AutoCAD workspace settings.
Just click on the Polar tracking symbol and click on the dropdown. We can choose angles that we want to track like 30,60,90,120 45,90,135, etc. (The shortcut key for on/off polar tracking is F10).
On the ribbon, click the View tab >> Palettes panel >> Command Line & Find Command-Line tool. Then press Ctrl+9. At the Command prompt, enter “COMMANDLINE“.
Also, Read Our Previous Article
- What is AutoCAD Electrical? (99% want to Know) March 2025

- AutoCAD Student Teacher Watermark (99% A-Z Tips) March 2025
- AutoCAD Earth Ground Symbols (70% Don’t Know) March 2025
- What Computer language was AutoCAD written in? (90% Don’t Know)
- Best 11 laptops for AutoCAD 2025 (100% You Like) March 2025

- Autodesk Takeoff 2025 | 80% of People Don’t Know (March 2025)

- AutoCAD Section Line | 100% You Don’t Know March 2025
- AutoCAD shortcut keys (80% New keys don’t Miss) March 2025
- AutoCAD 2025 software price in India (99% it’s Confusing) March 2025
- How does Autodesk clear temp files? (100% Legit Tips) March 2025


Leave a Reply