Hey Guys, Previously we discussed Unit setting in AutoCAD which is very important before starting any drawing. Now we will learn about How to do AutoCAD Workspace Settings and How to change to classic workspace in AutoCAD 2025
Now we will know something about some other settings which we need to know. So, let’s get started.
Do you know How to set AutoCAD Workspace Settings?
A workspace is utilized to store the present status of the AutoCAD UI.
To Save & set AutoCAD Workspace Settings follow the simple steps below.
In this activity, you’ll save a workspace named “HYT Workspace” & set a saved workspace currently.
1. In AutoCAD, on the strip, click View tab>>Palettes board>>Tool Palettes.
Find The Tool Palettes window ought to now be shown in the AutoCAD UI.
2. Reposition the Tool Palettes window on-screen in light of your inclination of area.
3. In AutoCAD, on the status bar, First click Workspace Switching. & find the setting symbol.
4. On the menu, pick Save Current As.
5. In the Save Workspace exchange box, type HYT Workspace and snap Save.

The new workspace is made and set current.
6. On the status bar, click Workspace Switching Find > Drafting and Annotation.
The Drafting and Annotation workspace is set current; the Tool Palettes window ought to never again be shown.
7. On the status bar, click Workspace Switching Find > HYT Workspace.
Yet again the HYT workspace is set current; the Tool Palettes window is shown.
What are the 3 workspace types in AutoCAD?
In AutoCAD, there are 3 workspace types below.
- 2D Drafting and Annotation: For 2D drawings, there are common ribbon tools.
- 3D Basics: For creating and viewing 3D models there are Basic ribbon tools.
- 3D Modeling: For 3D modeling, rendering & viewing A full set of ribbon tools.
Know AutoCAD Workspace Settings from our Youtube channel.
How to hide/show panels and tabs in AutoCAD?
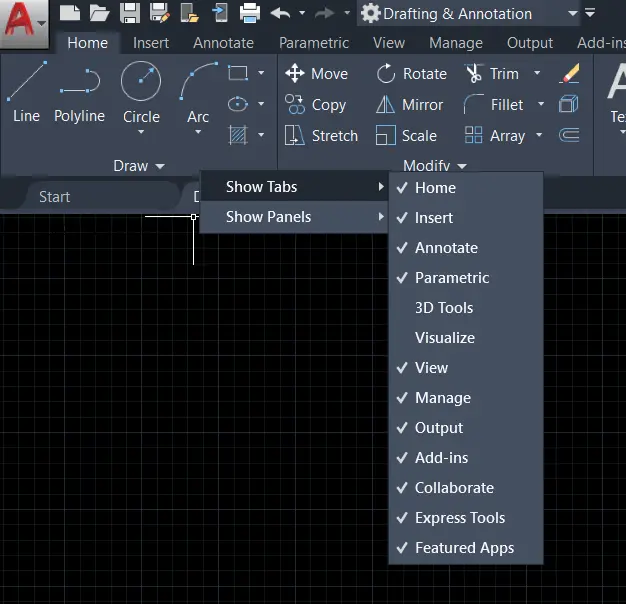
1. Simply right-click beside the panel’s dropdown menu.
2. It will show some options as shown.
3. Hide or show which pan or tabs you want to hide or show by simply clicking on that.
4. Also by clicking on this icon as shown, it will minimize panels and will increase the workspace area.
How to Restore all panels and tabs that are not visible?

Two Methods are there:
1. The first method is very simple. Just change the workspace from the ‘Quick access toolbar’ located at the top of the screen or from the ‘Status bar’ located at the bottom right corner of the screen.
Select 3D modeling and then again select 2D drafting & annotation.

2. The second method is to type ‘MENU’ in the command bar and press the Enter key.
It will show one dialogue box of templates.
Select ‘acad’ by default template. After selecting, it will show all panels and tabs.
How to Increase/Decrease Crosshair and Pick Box Size?

1. Crosshair means the ‘+’ sign of the cursor and the small square we can show in the ‘+’ sign is called a pick box.
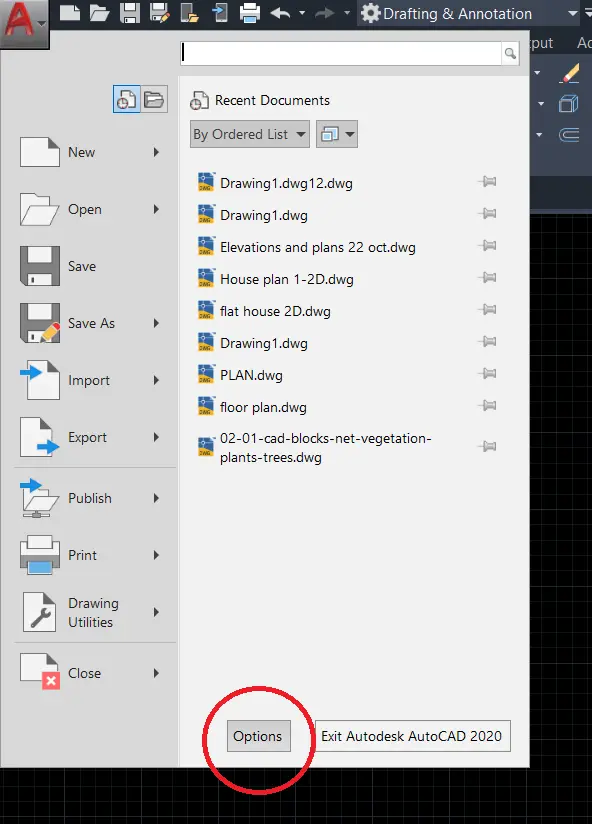
2. Click on the ‘Application Menu’ located in the upper left corner of AutoCAD and select ‘Options’ located on the bottom right side. One dialogue box will be open.
3. Or type ‘OP’ in the command bar and press the Enter key. One dialogue box will be open.

4. To increase/decrease pick box size, select the ‘Selection’ tab.
We can simply increase or decrease size from there as shown.

5. To increase/decrease crosshair size, select the ‘Display’ tab.
We can set the crosshair size from there as shown.
How to Change the Background Color of the Workspace in AutoCAD?
1. Click on the ‘Application menu’ located in the upper left corner of AutoCAD and select ‘Options’ located on the bottom right side.
One dialogue box will be open.
2. Or type ‘OP’ in the command bar and press the Enter key.
One dialogue box will be open.
3. By default, it will open by selecting the ‘Drafting’ option.
If not selected, then select the ‘Drafting’ tab.
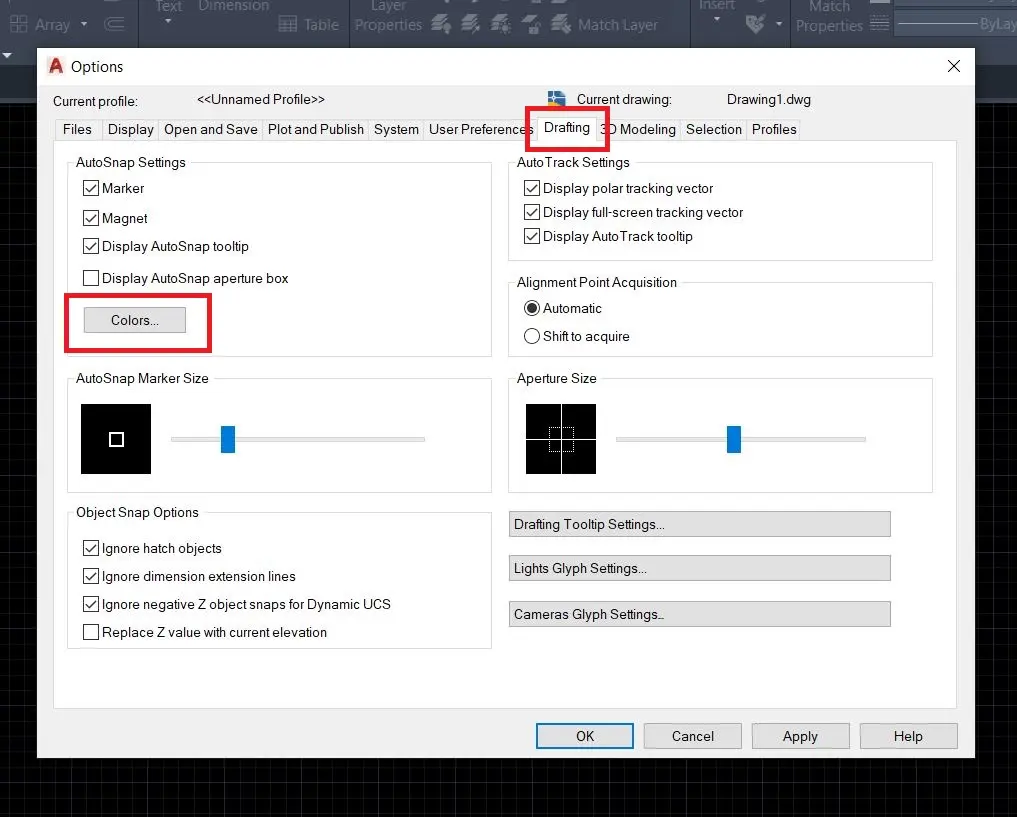
4. By clicking on ‘colors’, one dialogue box will be open.
5. Select ‘uniform background’ from the interface element. And change the color which you want.
6. After selection click on ‘Apply and close. AutoCAD workspace background color will be changing as per selection.

How to Status Bar Settings in AutoCAD? (How to set AutoCAD Workspace Settings)
The status bar is placed at the lower right corner of the workspace screen.
If some icons are not shown, then we can add them from the customization placed at the last three-line icon as shown.

1. Grid mode:
We can on/off gridlines by the first icon ‘Grid mode’ (The shortcut key for on/off-grid mode is F7).
2. Orthomode:
Orthomode is useful to draw a straight line horizontally or vertically. (The shortcut key for on/off orthomode is F8)
3. Polar Tracking:
In AutoCAD polar tracking is useful to track angles for drawing lines at particular angles.
We can choose angles that we want to track like 30,60,90,120 or 45,90,135,180 from the dropdown menu. (The shortcut key for on/off polar tracking is F10)
4. Auto snap (AutoCAD Workspace Settings)
Auto snap is useful to show snapping reference points.
By on this icon, we can snap points of the other objects. (The shortcut key for on/off the auto snap is F11)
5. Object Snap(Osnap) (How to set AutoCAD Workspace Settings)
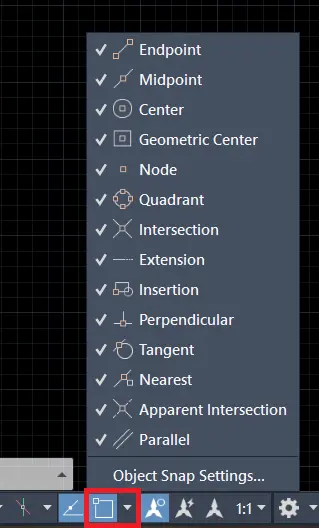
Object snap is useful for snapping object points.
For example, if I have one line and I want to show its midpoint then I have to on the Osnap command or icon.
Putting the cursor on the line will show the starting point, middle point, and endpoint of the line. (The shortcut key for on/off Osnap is F3)
How do I restore the status bar in AutoCAD?
To turn or restore the status bar follow these simple steps below.
- On the command line, you have to type MENUBAR & set the value to 1.
- Then click on the Tools then the Toolbars menu.
- And the last select the toolbars that you want to turn on.
Where should you look on the Autocad screen to find the status bar?
To find the status bar Do one of the following:
- On the ribbon please select View then Status Bar.
- And then on the menu, you have to select View then Display then also select Status Bar.
- Simply type the stat bar & then press the Enter key.
How to Set limits in AutoCAD?
If we want to create a large drawing and we want to set a certain limit from which we don’t want to draw outside of that limit, then it is necessary to set limits in AutoCAD.
The limit setting means to set our workspace page in specific limits like the width of our workspace space is 1000 meters and height is 500 meters.
1. Type ‘LIMITS’ in the command bar and press Enter key.
2. AutoCAD will ask for a specific lower-left corner. Set a lower-left corner as required.
3. Then AutoCAD will ask for the upper right corner. Specify the upper right corner.
4. Then again type ‘LIMITS’ in the command bar press Enter and click on ‘on’. By limits, we cannot work outside of the limit set by us.
5. We can also set our limits from the origin point.
For that, we have to type (0, 0) to set the lower-left corner.
And type upper right corner coordinates as per requirement.
Example of AutoCAD Workspace Settings
1. If you want to set the limit as the width is 1000mm and the height is 500mm.
2. Then I will draw one rectangle of width 1000mm and a height of 500mm by typing ‘REC’ in the command bar.
3. Then I will invoke the limit command by typing ‘LIMITS’ in the command bar.
4. I will specify the lower-left corner as a lower-left corner of the rectangle and the upper-right corner as an upper-right corner of the rectangle.

5. I will again invoke the limit command and will select ‘on’.
6. Then I will press the ‘Z’ key and press the ‘Enter’ key Then again I will press the ‘A’ key and press the ‘Enter’ key. The limit will be set.

AutoCAD workspace settings file location
Keep Note: For various AutoCAD-based items CUIX documents are put away in different areas, for instance:
For the AutoCAD software in C:\Users\\AppData\Roaming\Autodesk\AutoCAD XXXX\RXX\\Support.
For the Civil 3D software in C:\Users\\AppData\Roaming\Autodesk\C3D XXXX\\Support.
FAQ on AutoCAD Workspace Settings
Keep the past variant of AutoCAD introduced on the old PC.
Introduce the new rendition of AutoCAD in preliminary mode on the old PC.
Utilize the movement utility to move settings from the more seasoned adaptation of AutoCAD to the new variant:
for Windows 10 & 8.1: first of all Start >> AutoCAD 20xx >> Migrate From a Previous Release
Windows 7 & XP: Start >> All Programs >> Autodesk >> AutoCAD 20xx >> Migrate Custom Settings >> Migrate From a Previous Release
At the point when the relocation of settings is finished, trade these settings from the new adaptation of AutoCAD:
Windows 10 & 8.1: Start >> AutoCAD 20xx >> Export AutoCAD 20xx Settings
Windows 7 & XP: Start >> All Programs >> Autodesk >> AutoCAD 20xx >> Migrate Custom Settings >> Export AutoCAD Settings
Import the settings into the new rendition of AutoCAD on the new PC:
Windows 10 & 8.1: Start >> AutoCAD 20xx >> Import AutoCAD 20xx Settings
Windows 7 & XP: Start >> All Programs >> Autodesk >> AutoCAD 20xx >> Migrate Custom Settings >> Import AutoCAD Settings
Work areas are frequently ignored in AutoCAD LT. There’s only one course, which is Drafting and Annotation.
Also, Read Our Previous Article
- What is AutoCAD Electrical? (99% want to Know)

- AutoCAD Student Teacher Watermark (99% A-Z Tips)
- AutoCAD Earth Ground Symbols (70% Don’t Know)..
- What Computer language was AutoCAD written in? (90% Don’t Know)
- Best 11 laptops for AutoCAD (100% You Like)

- Autodesk Takeoff 2025 | 80% of People Don’t Know (July 2025)

- AutoCAD Section Line | 100% You Don’t Know July 2025
- AutoCAD shortcut keys (80% New keys don’t Miss) July 2025
- AutoCAD 2025 software price in India (99% it’s Confusing) July 2025
- How does Autodesk clear temp files? (100% Legit Tips) July 2025


Leave a Reply