Guys, Earlier we discussed the Construction line (Xline) which is useful for Draw Elevation. Ray Command in AutoCAD, How to use Ray Command full tutorial
Now we will learn something about how to use the Ray command. So, let’s get started.
Ray Command in AutoCAD
1. In the Draw panel, many options are available related to the line.
We can see this by clicking on the draw drop-down menu.
2. Spline fit, Spline CV, Multiple points, Construction line, Ray, Multiline, Divide, Measure, Region, Helix, Donut, Revision clouds, etc options are available in the draw panel drop-down menu.
Now we will learn how to use the Ray command.
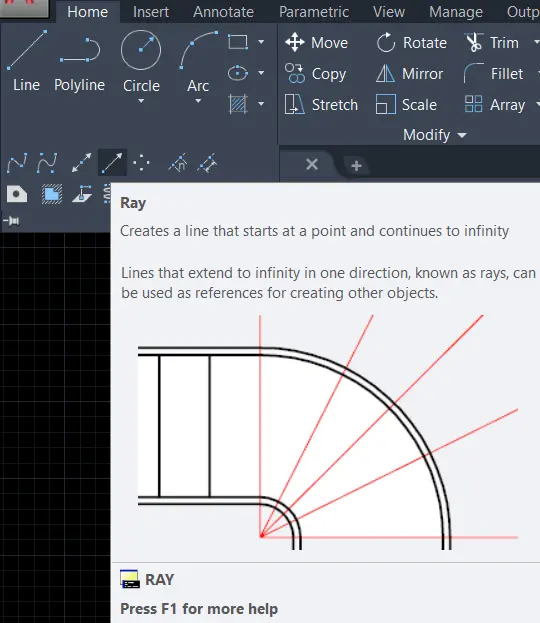
3. Ray creates a line that starts from a particular point and continues to infinity.
4. The line that starts from one point and extends to infinity only in one direction and also can be drawn in particular angles called a ray.
5. It is used as a reference to create other objects.
6. Ray creates a line that starts from a particular point and continues to infinity.
7. The line that starts from one point and extends to infinity only in one direction and also can be drawn in particular angles called a ray.
8. It is used as a reference to create other objects.
7. We can invoke the Ray command by selecting Ray from the drop-down menu of the draw panel or typing ‘RAY’ in the command bar.
8. press the Enter key.
9. Specify the first point from where you want to start.
10. By clicking on the first point we can show a difference in ‘line’ and ‘ray’.
11. then specify the next point where you want vertical, horizontal, or at any angle.
Example of Ray Command in AutoCAD.
1. if I want to do three parts of my rectangular step of the staircase at the angles of 30 degrees.
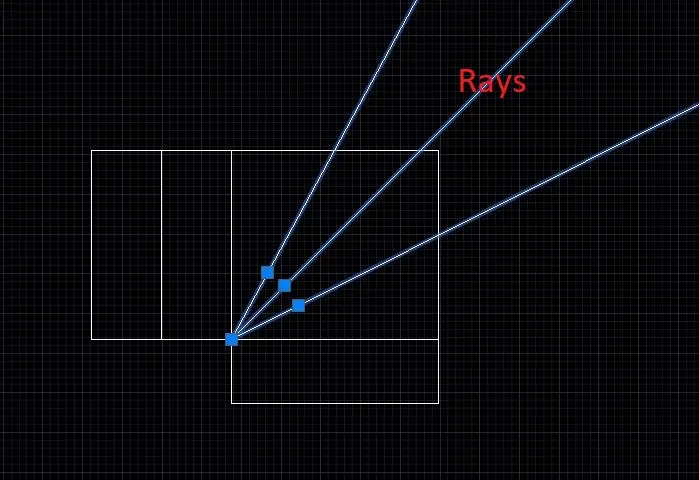
2. I will turn on the ‘Polar tracking’ command from the Status bar located at the bottom right corner of the workspace interface as we discussed in the workspace settings.
3. (The shortcut key for on/off polar tracking is F10).
And I will select the (30,60,90,120) option for tracking angles from the dropdown menu.
4. Then I will select the Ray command from the dropdown menu of the draw panel for invoking the command or by typing ‘RAY‘ in the command bar.
5. I will select the base point bottom left corner of the rectangle, from which I want to draw ray lines.
6. Then I will draw rays at the 30-degree angle with the help of polar tracking.
7. At last, I will trim extra ray lines that are coming outside from the rectangle.

What is the difference between the Construction line (X-line) and the Ray line?
The construction line (also called an X-line) is a linear object which is passing through one point and extends to infinity in both directions.
Whereas The Ray command is a linear object that starts from a particular point and continues to infinity.
Thank you for visiting here…
Know more about Ray Command in AutoCAD from our YouTube channel
Also, Read Our Previous Article
- What is AutoCAD Electrical? (99% want to Know)

- AutoCAD Student Teacher Watermark (99% A-Z Tips)
- AutoCAD Earth Ground Symbols (70% Don’t Know)..
- What Computer language was AutoCAD written in? (90% Don’t Know)
- Best 11 laptops for AutoCAD (100% You Like)

- Autodesk Takeoff 2025 | 80% of People Don’t Know (July 2025)

- AutoCAD Section Line | 100% You Don’t Know July 2025
- AutoCAD shortcut keys (80% New keys don’t Miss) July 2025
- AutoCAD 2025 software price in India (99% it’s Confusing) July 2025
- How does Autodesk clear temp files? (100% Legit Tips) July 2025


I think this platform is good for learning thumbs up developers 👍🏾👍🏾
Thanks for appreciating me..Thank you so Much Again..