There is some process to print in AutoCAD and export PDF or JPG images.
Do you know How to print in AutoCAD?
Printing or Exporting DWG to PDF is one of the main advantages of AutoCAD.
We can Export 2D as well as 3D drawing PDF files.
Follow these steps to Print in AutoCAD.
Method 1: How to print in AutoCAD
Follow these steps to Convert AutoCAD DWG to PDF:
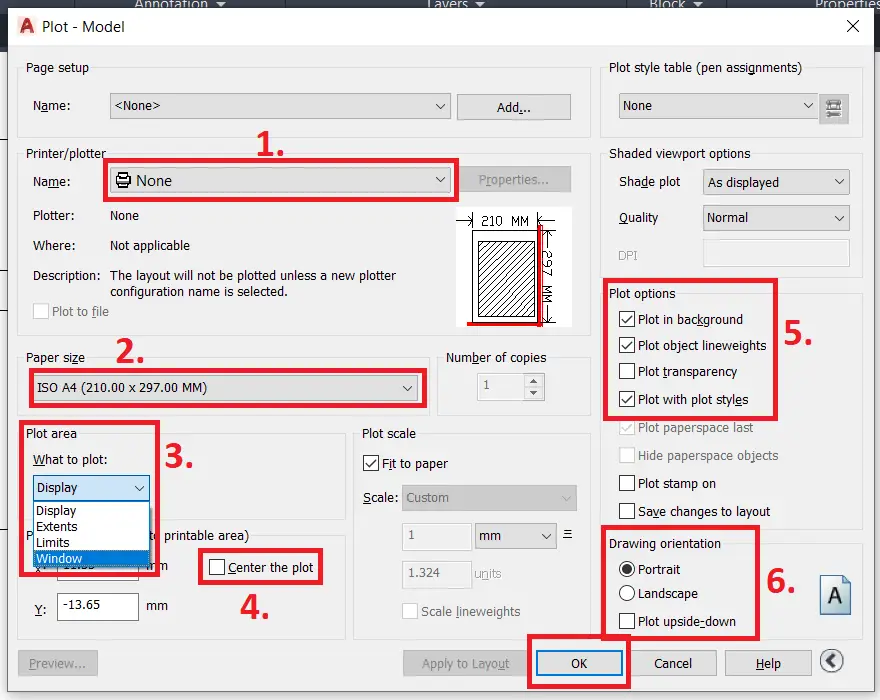
1. Click on the ‘Application menu’ (logo of AutoCAD) at the top left corner of the workspace.
2. Select the AutoCAD ‘Print’ option. One dialogue box will be open.
3. Or press ‘Ctrl+P’. The same dialogue box will be open.
4. Change the name ‘DWG to PDF’ or ‘AutoCAD to PDF’ from none. OR select ‘DWG to PNG OR JPG’ which you want as per your requirement.
5. Set paper size as per requirement.
6. Set the paper area ‘Display, Limit or Window’. The display will plot the area as per the display. In the limit, it will plot our drawing as per the boundary limit set by us. And in Window, We have to select an area.
7. Checkmark the ‘Center the plot’.
8. Set ‘Drawing orientation’ as ‘Portrait, landscape, and plot upside-down’ as per your drawing requirement.
9. Checkmark the ‘Plot transparency’ from the ‘Plot options’.
10. Click on the ‘Preview’ to see the preview of the pdf or jpg which you have selected.
11. At last, click on the ‘Ok’
Method 2: How to print in AutoCAD
1. Select ‘Export’ from the ‘Application Menu’ and select PDF from the Export options.
2. We can also save it as a pdf from here.
How to add custom paper size in AutoCAD?
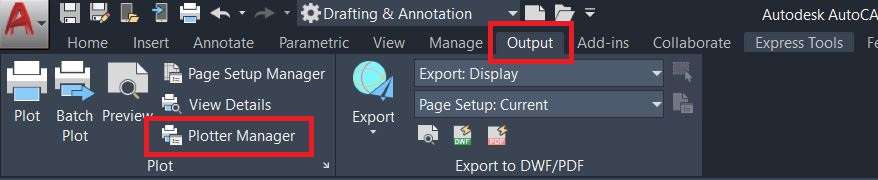
1. To add custom paper size, Click Output tab > click Plot panel > click Plotter Manager. Find it.
2. After that, double-click on the plotter configuration (PC3) file that you want to edit.
3. Then go to the Device and Document Settings tab.
4. After that, double–click on the User-Defined Paper Sizes and Calibration.
5. Select Custom Paper Sizes.
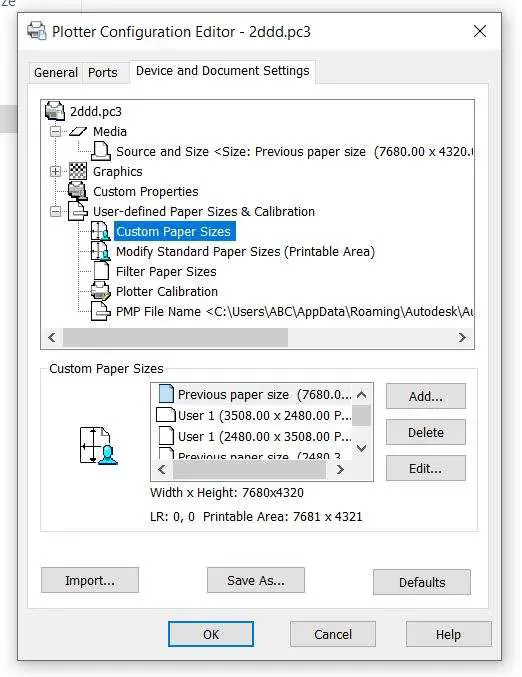
6. Under the Custom Paper Sizes, click on the Add option.
7. In the Custom Paper Size wizard, Begin page, select Start from Scratch. Click Next.
8. Select Inches or Millimeters for paper size in the Units list.
9. Specify the paper width and length as needed. Click on Next.
10. Set the printable area properly by using the Top, Bottom, Left, and Right on the Printable Area page.
11. Enter a name for the new custom paper.
12. Enter a name for the PMP file on the File Name page.
13. Then at the finished page, specify that the paper source is Sheet–Fed or Roll–Fed.
14. Click on Finish to exit the Custom Paper Size.
Thank you for reading. Learn Free AutoCAD here.

Know more About AutoCAD on Youtube
Read our new Article
- What is AutoCAD Electrical? (99% want to Know)

- AutoCAD Student Teacher Watermark (99% A-Z Tips)
- AutoCAD Earth Ground Symbols (70% Don’t Know)..
- What Computer language was AutoCAD written in? (90% Don’t Know)
- Best 11 laptops for AutoCAD (100% You Like)

- Autodesk Takeoff 2025 | 80% of People Don’t Know (July 2025)

- AutoCAD Section Line | 100% You Don’t Know July 2025
- AutoCAD shortcut keys (80% New keys don’t Miss) July 2025
- AutoCAD 2025 software price in India (99% it’s Confusing) July 2025
- How does Autodesk clear temp files? (100% Legit Tips) July 2025


Leave a Reply