Good morning friends today we are learning about How to change paper size in AutoCAD and AutoCAD custom paper size pdf, How to change margins in AutoCAD layout
Do you know How to change paper size in AutoCAD?
Follow these steps to change the paper size in AutoCAD:
1. First of all, click on the layout tab, for which you want to change the Paper size.

2. Then click on the “Layout” tab at the top of the workspace.
3. Click on the “Page setup” in the ‘Layout’ panel. One dialogue box will open.

4. If you want to create a new layout, then click on the “New” option.
5. Otherwise, click on “Modify”. One another dialogue box will be open.
6. From this dialogue box, you can set the paper size as per your requirements.
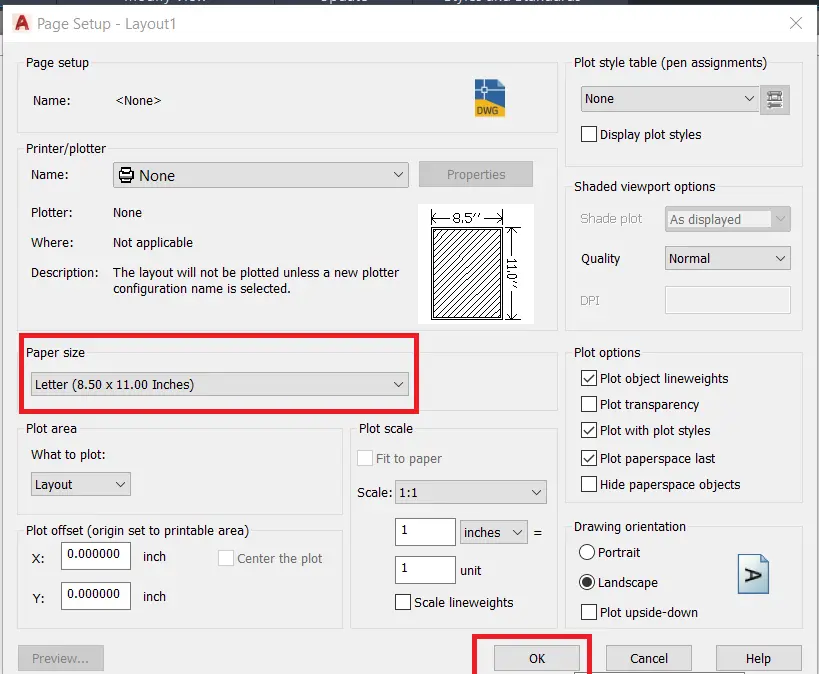
7. Click on ‘OK’. Then click on ‘Set current’ and click on Close.
8. Your paper size is set now.
Try this other way to Set the change paper size & orientation.
Select the paper size & orientation.
1. First of all Click the Layout tab/Model tab for which you need to set the paper size.
2. Do one of the following to select the Page Setup Manager  :
:
a) On the ribbon, choose the Application button then select Page Setup Manager otherwise select Output >> Page Setup Manager.
b) In the menu, select File >> Page Setup Manager.
c) On the Format toolbar, click the “Page Setup Manager tool“.
d) Then type page setup & then click Enter.
3. After that Select the desired page setup, then click “Modify”.
4. In Paper size, select a paper size by your selected printer.
5. In Orientation, select the following settings on pc
a) Portrait/Landscape: First of all Select Portrait for vertical paper orientation/Landscape for horizontal paper orientation.
b) Print upside down: Select to print the drawing upside down on your printer.
6. Click “OK“
What are standard paper sizes in AutoCAD?
Let’s see below the standard paper sizes in AutoCAD.
| PAGE SIZE | PAGE HIGHT (mm) | PAGE WIDTH (mm) |
|---|---|---|
| A0 | 841 | 1188 |
| A1 | 594 | 841 |
| A2 | 420 | 594 |
| A3 | 297 | 420 |
| A4 | 210 | 297 |
| A5 | 148 | 210 |
How to add custom paper size in AutoCAD?
1. To add custom paper size, Click Output tab > click Plot panel > click Plotter Manager.
2. After that, double–click on the “plotter configuration file” (PC3) that you want to edit.
3. Then go to the “Device and Document Settings tab”
4. After that, double–click on the User-Defined Paper Sizes and Calibration.
5. Select Custom Paper Sizes.
6. Under the Custom Paper Sizes, click on the “Add option”.
7. In the Custom Paper Size wizard, Begin page, select Start from Scratch. Click “Next”.
8. Select “Inches” or “Millimeters” for paper size in the Units list.
9. Specify the paper width and length as needed. Click on Next.
10. Set the printable area properly by using the Top, Bottom, Left, and Right on the Printable Area page.
11. Enter a name for the new custom paper.
12. Enter a name for the “PMP file” on the File Name page.
13. Then at the finished page, specify that the “paper source” is Sheet-Fed or Roll-Fed.
14. Click on Finish to exit the Custom Paper Size.
Also, visit our new Q & A articles. You can search for your other questions about AutoCAD in the search bar. Thank you for visiting here.

FAQ
A named page setup indicates settings, for example, the plot area, paper size, and scale, which decide the presence of a plotted or distributed yield.
Keep Note: Instead of making a named page setup without any preparation, you can import a named page setup from an appropriately set up drawing for plotting or distributing.
1. First of all Click the Output tab >> plot panel >> Page Setup Manager.
2. In the Page Setup Manager >> Page Setups area >> click New.
3. In the New Page Setup dialog box, Please enter a name for the new page setup.
4. Under Start With, select a page setup near the settings you need, and snap OK.
5. In the Page Setup dialog box change settings as required see below:
a. In the Printer/Plotter segment, determine the default plotter to use while plotting or distributing.
b. In the “Paper Size list”, select the default paper size to use for plotting or distributing.
c. In the Plot Area segment, determine which area the attractive to plot.
d. In the Plot Scale box, determine the scale to utilize.
Keep note: If you select Layout as the Plot Area, the design is plotted at a 1:1 scale, no matter what plot scale you indicate.
e. In the Drawing Orientation area, set the direction.
Keep note: For rotating the drawing by 180 degrees & select Plot Upside Down.
6. Click OK.
The new page setup is shown in the Page Setups list in the Page Setup Manager.
Know more About AutoCAD on Youtube
You can Read our Other Articles
- What is AutoCAD Electrical? (99% want to Know)

- AutoCAD Student Teacher Watermark (99% A-Z Tips)
- AutoCAD Earth Ground Symbols (70% Don’t Know)..
- What Computer language was AutoCAD written in? (90% Don’t Know)
- Best 11 laptops for AutoCAD (100% You Like)

- Autodesk Takeoff 2025 | 80% of People Don’t Know (July 2025)

- AutoCAD Section Line | 100% You Don’t Know July 2025
- AutoCAD shortcut keys (80% New keys don’t Miss) July 2025
- AutoCAD 2025 software price in India (99% it’s Confusing) July 2025
- How does Autodesk clear temp files? (100% Legit Tips) July 2025


Leave a Reply